How to Use the PADI RDP and eRDPml – A Comprehensive Guide
The PADI Recreational Dive Planner (RDP) and the eRDPml (electronic Recreational Dive Planner, multi-level) are essential tools for planning safe dives and ensuring that you stay within safe no-decompression limits (NDL). Mastering their use is important for dive professionals, as it will help explain how computers work and is also a good backup option if you have the knowledge. In this guide, we’ll break down the steps to effectively use these planners, along with helpful tips, and advice on incorporating dive profile graphs.
Studying for your PADI IDC or IE? Find practice and mock IDC exams here!
Understanding the Basics of the RDP
The PADI RDP comes in two formats: a table version and an electronic version (eRDPml). Both tools serve the same purpose — to calculate your nitrogen absorption during a dive and to plan repetitive dives. Below are the core components of the RDP and their functions:
No-Decompression Limits (NDLs): This indicates how long you can stay at a certain depth without requiring decompression stops.
Surface Interval Credit: This section of the RDP shows how much nitrogen is off-gassed during your surface intervals (the time you spend at the surface between dives).
Repetitive Dive Calculations: When making multiple dives in a day, the RDP helps adjust your limits based on residual nitrogen from your previous dive.
How to Use the RDP
Here’s a step-by-step guide on how to use the PADI RDP:


Step 1: Choose Your Depth
- Locate the maximum depth you plan to dive on the RDP. Always round up to the nearest deeper depth for safety (e.g., if you plan to dive to 16 meters, use the 18-meter column).
Step 2: Determine No-Decompression Limit (NDL)
- In the depth column, find the number next to your depth. This number is your NDL — the maximum time you can stay at that depth without requiring decompression stops.
Step 3: Plan Your Surface Interval
- After completing your first dive, consult the Surface Interval Table (SIT) on the RDP. This table shows how much nitrogen is off-gassed during your surface interval.
- Cross-reference your Pressure Group (PG) at the end of the dive with the amount of time you spend on the surface to determine your new PG.

Step 4: Plan Your Repetitive Dive
- Use the new PG you got from the SIT and move on to the Repetitive Dive section of the RDP. Select your new depth and check the adjusted NDL for repetitive dives based on your PG.

Using the eRDPml
The eRDPml simplifies multi-level diving calculations. Here’s how to use it:
Step 1: Select Your Planning Mode
- Select the planning mode, Dive Planning, Surface Interval, or Max Depth.
- Is it a multilevel dive YES/NO
- First dive of the day YES/NO
Step 2: Input Dive Parameters
- Enter the depth and time for each dive, along with your surface interval time. The eRDPml will automatically calculate your Pressure Group and NDL for the next dive.
Step 3: Plan Multi-Level Dives
- For multi-level dives, input your starting depth and time, then input additional levels. The eRDPml adjusts the NDL based on your cumulative nitrogen exposure across multiple depths.
Step 4: Track Your Surface Interval
- As with the manual RDP, ensure you have an adequate surface interval between dives. The eRDPml makes this simple by tracking the entire profile for you.
Practical Tips for Using the RDP and eRDPml
Write Down All Information: Always write down your dive profiles, depths, times, and pressure groups. This is especially useful for repetitive or multi-level diving and prevents confusion during a busy dive day.
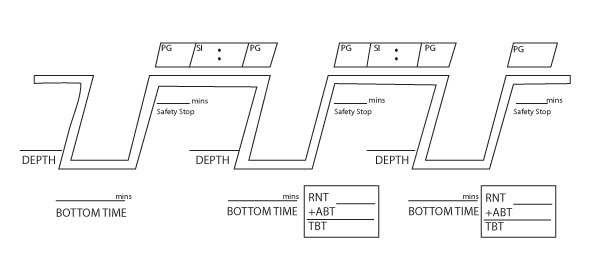
Use a Dive Profile Graph: Visualize your dive using a dive profile graph. Create a simple graph showing your depth over time to see exactly how your dive progresses and how nitrogen is absorbed at each level.
Stick to Conservative Limits: Even though the RDP gives you precise NDLs, it’s a good idea to build in an extra safety buffer, especially on repetitive dives.
Monitor Your Air Supply: Don’t forget that air consumption is a crucial factor in planning dives. Ensure your dive time also allows enough air for a safe ascent.
Common Mistakes to Avoid
Failing to Round Up Depths: Always round up to the nearest greater depth to build in a safety buffer.
Ignoring Surface Intervals: Even short surface intervals must be carefully calculated to avoid nitrogen build-up.
Skipping Documentation: Writing down your dive details ensures you can plan safely for the next dive and keep track of your nitrogen exposure.
Using a Dive Profile Graph for Better Planning
A dive profile graph is a useful tool that lets you map out your depth and time across the dive. Here’s how to create one:
- Draw Your Axes: On graph paper, the vertical axis represents depth, while the horizontal axis represents time.
- Plot Your Dive: Begin by plotting your initial descent to the maximum depth and marking the time spent at that depth.
- Track Changes: If your dive is multi-level, track the change in depth by plotting your ascent to shallower levels and time spent at each one.
- Mark Safety Stops: Clearly mark where safety stops occur, typically at 5 meters for 3 minutes.
- Surface Interval Tracking: For repetitive dives, leave enough room on the graph to track surface interval times.
By combining your understanding of the RDP with a dive profile graph, you can ensure more accurate dive planning and enhanced safety during multiple or multi-level dives.
Conclusion
Using the PADI RDP and eRDPml is a vital skill for divers at all levels. Writing down your dive details and utilizing a dive profile graph will simplify your planning process and help you dive safely. Mastering these tools early on will build your confidence as a diver and set you on the path to safe and enjoyable dives.

